
Create a Campaign
This guide walks you through creating a new campaign from start to finish. By the end, you'll have an active campaign reaching out to your ideal prospects.
Before You Start
Make sure you have:
- ✅ At least one channel connected (email or LinkedIn)
- ✅ An idea of your target audience
- ✅ Your key messaging points ready
Step-by-Step Guide
From your dashboard, click Create Campaign or navigate to Campaigns and click New Campaign.
Set your Ideal Customer Profile criteria to define who you want to reach:
Job Titles Enter the roles you're targeting:
- VP of Sales
- Sales Director
- Head of Revenue
Seniority Level Select appropriate levels:
- C-Level
- VP
- Director
- Manager
Industries Choose relevant business sectors:
- Software / SaaS
- Financial Services
- Healthcare
Company Size Define employee count ranges:
- 50-200 employees
- 201-1000 employees
- 1000+ employees
Location Specify geographic targets:
- Countries: United States
- States/Regions: California, New York
- Cities: San Francisco, New York City
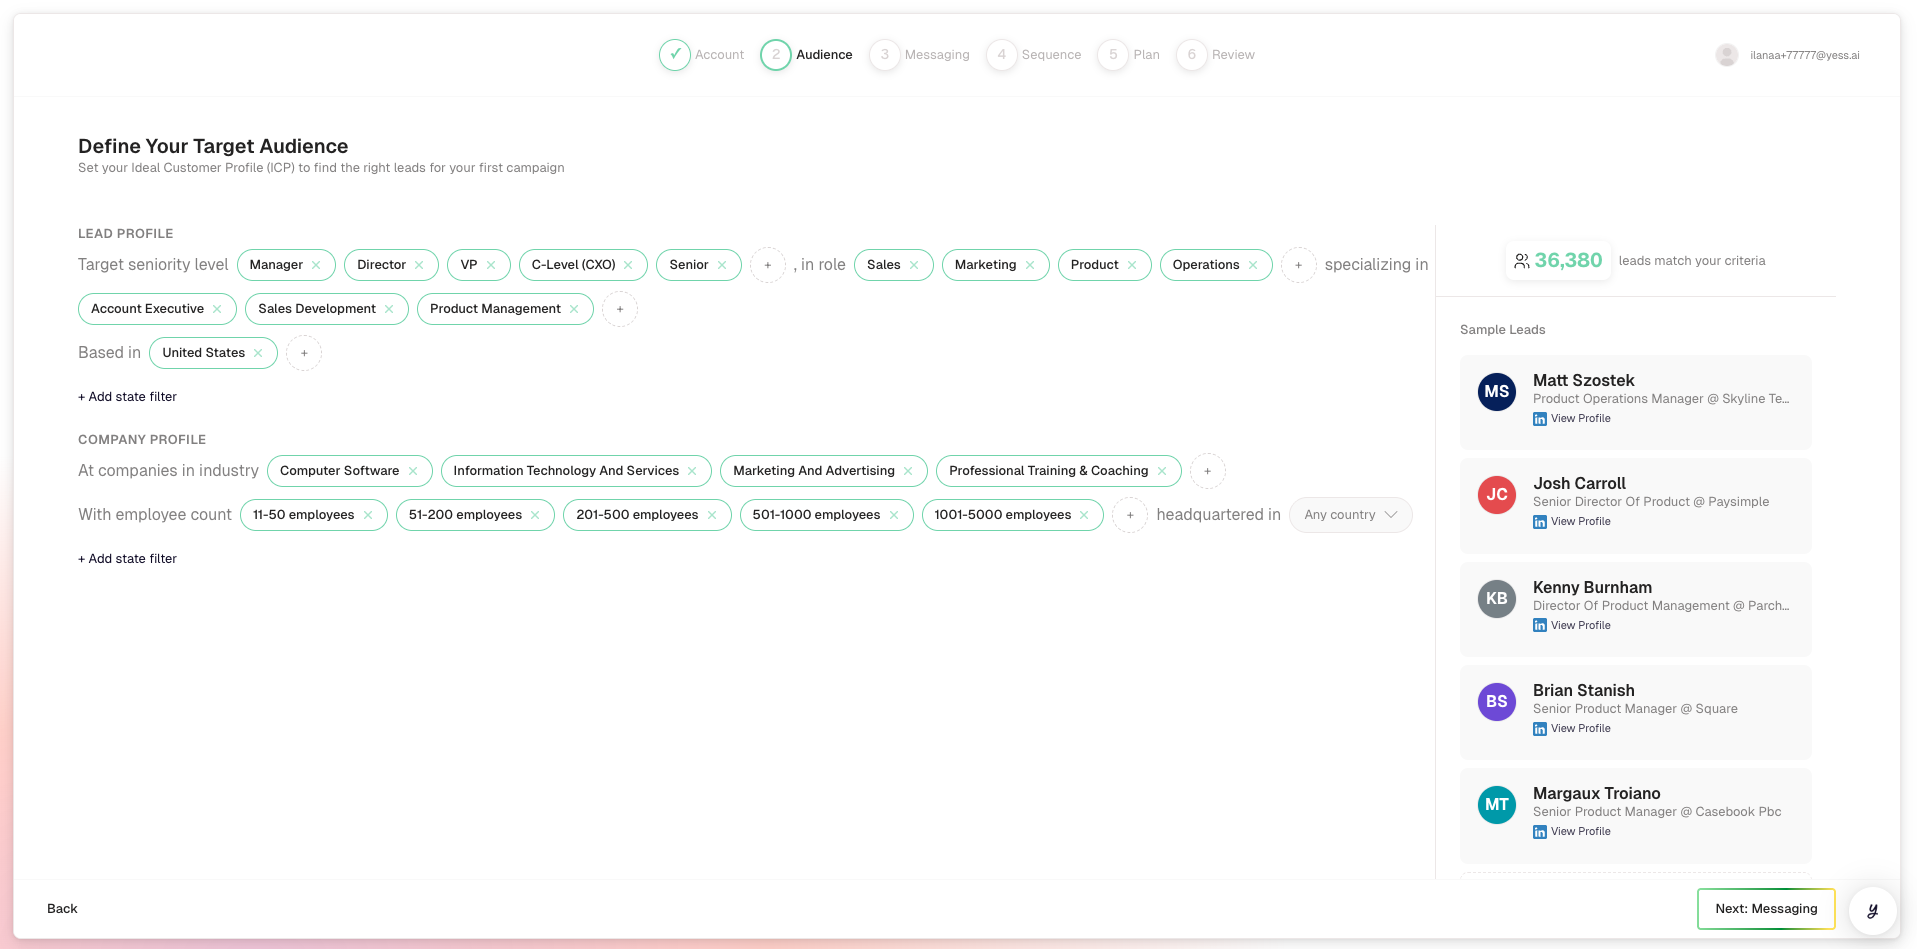
As you set criteria, you'll see an estimated lead count showing how many prospects match.
Start narrow. You can always expand your audience later, but it's harder to narrow down once you've launched.
Click Next to continue.
Tell the AI how to communicate with your leads:
Tone Select your preferred communication style:
- Professional
- Friendly
- Direct
- Conversational
Instructions Provide specific guidance for the AI. Be clear about:
- What to emphasize
- What to avoid
- How to position your offering
Example:
Focus on how we help sales teams reduce prospecting time by 50%.
Mention our integration with Salesforce if relevant.
Keep messages concise (under 150 words).
Don't mention competitors by name.
Call-to-Action Define what you want leads to do:
- "Let's schedule a 15-minute call to discuss"
- "Reply if you'd like to learn more"
- "Check out our recent case study [link]"
Pitch Elements (optional but recommended)
Pain Points: What problems does your product solve?
- "Sales teams spend too much time on manual prospecting"
- "Hard to personalize outreach at scale"
Value Propositions: What benefits do you offer?
- "Save 10+ hours per week on prospecting"
- "2x response rates with AI personalization"
Social Proof: What results can you share?
- "Helped Company X increase meetings by 40%"
- "Trusted by 500+ sales teams"
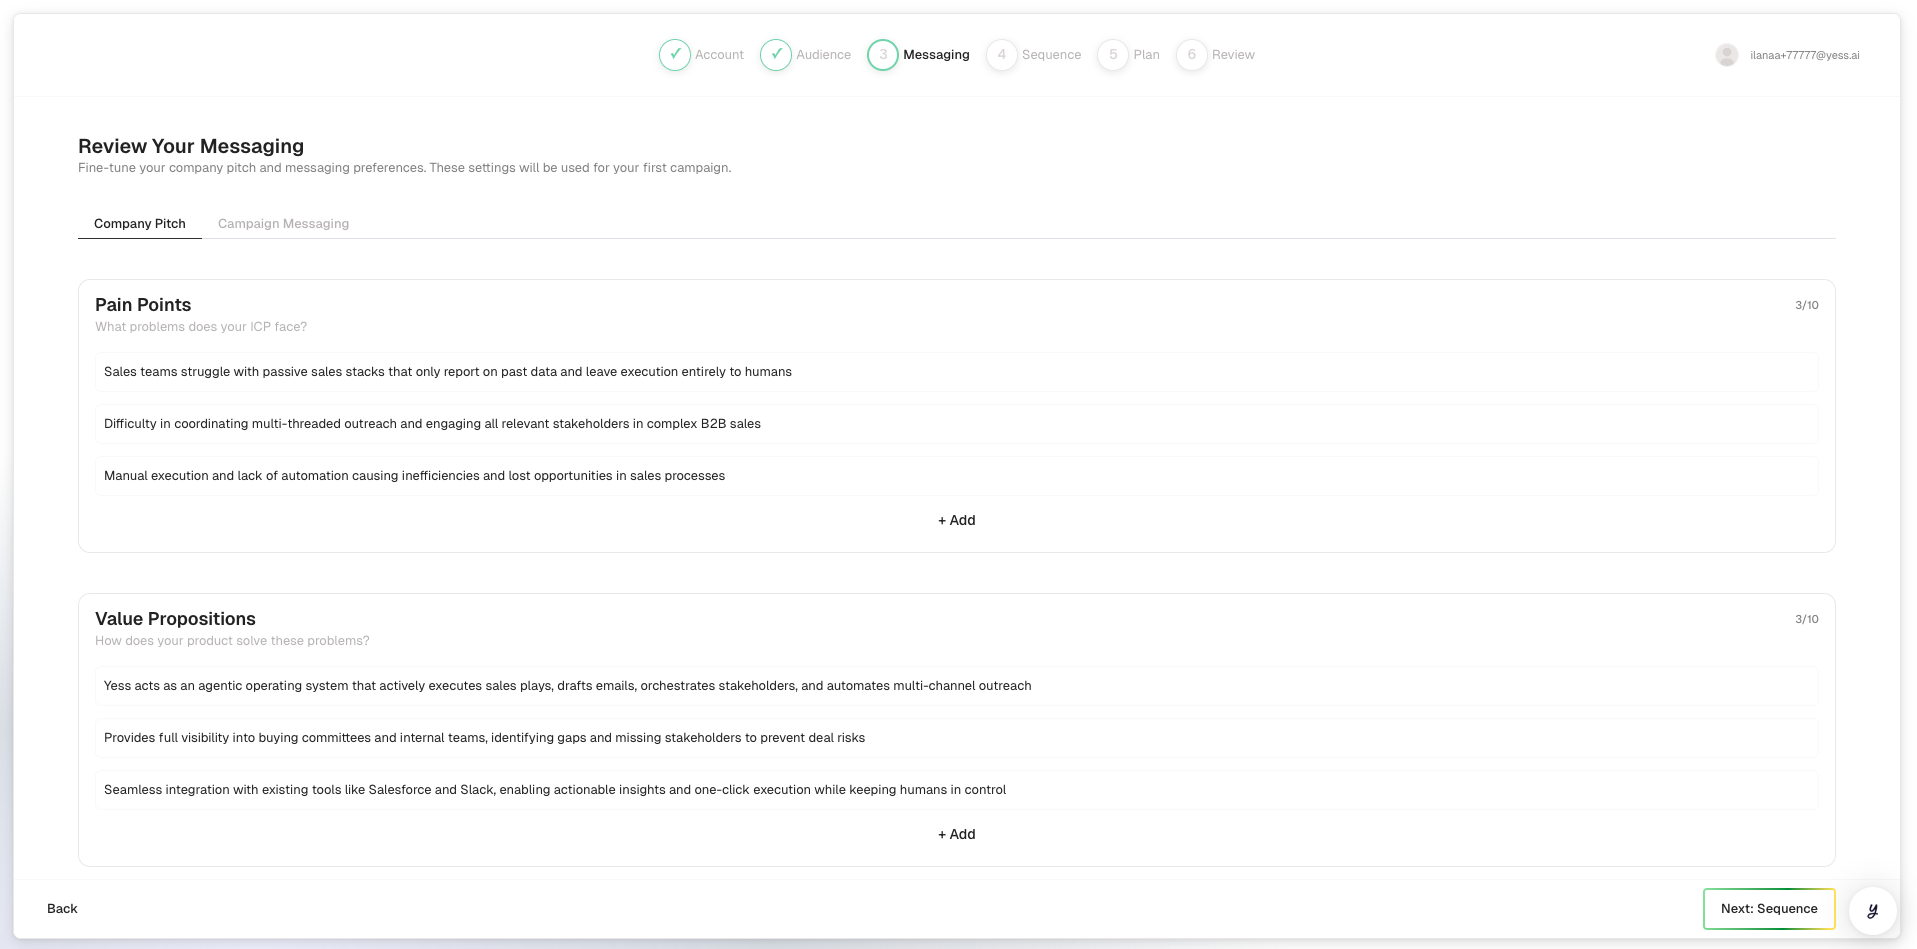
Click Next to continue.
Select a pre-built sequence that defines your outreach cadence:
Browse Available Strategies You'll see options like:
- Email Only
- LinkedIn Only
- Email + LinkedIn (recommended for most use cases)
- Email + LinkedIn + Follow-ups
Preview the Sequence Click on a strategy to see its steps:
Day 0: Send personalized email
Day 3: Send LinkedIn connection request
Day 6: Send follow-up email (if no reply)
Day 10: Send final email (if no reply)
Check Channel Requirements Make sure you have the required channels connected. You'll see indicators showing:
- ✅ Email: Connected
- ✅ LinkedIn: Connected
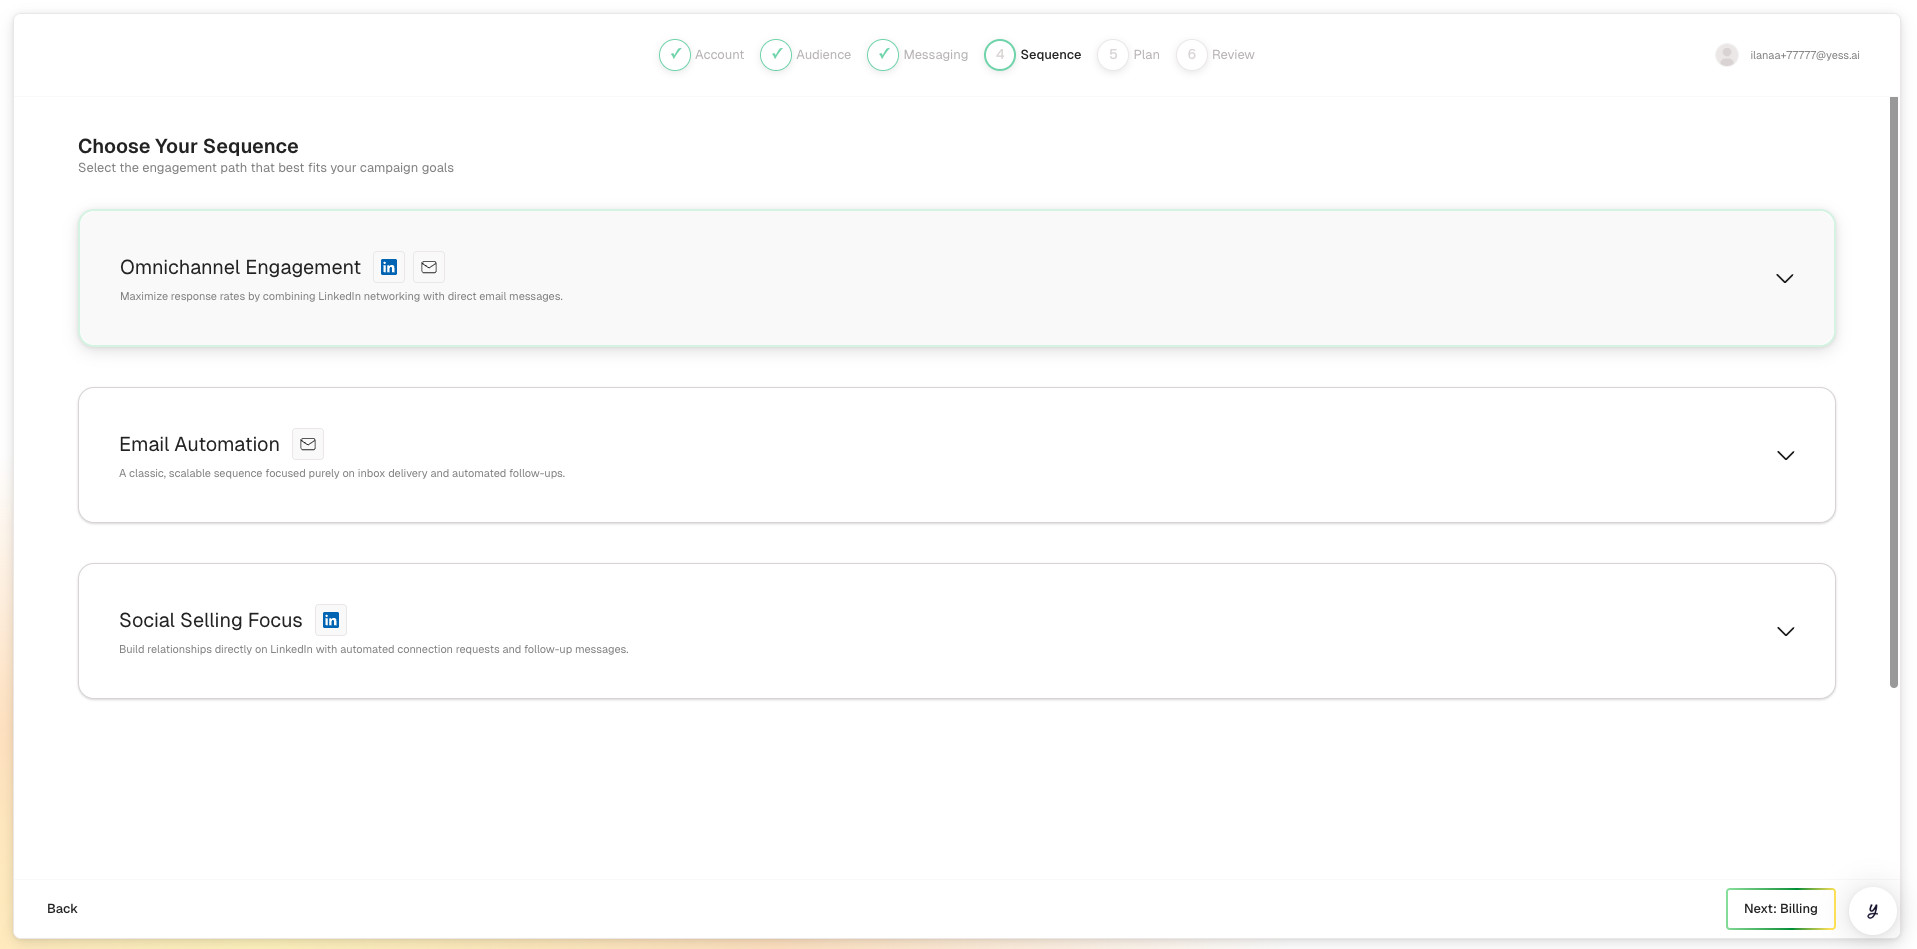
Select your preferred strategy and click Next.
Review all your campaign settings before launching:
Summary View
- AI-generated campaign name and description (editable)
- Audience criteria and estimated reach
- Messaging guidance summary
- Selected sequence strategy
Monthly Quota See how many leads will be enrolled:
- Monthly limit: 500 leads
- Daily enrollment: ~20 leads
- Enrollment pacing note
Channel Status Verify all required integrations are connected:
- Email: ✅ Ready
- LinkedIn: ✅ Ready
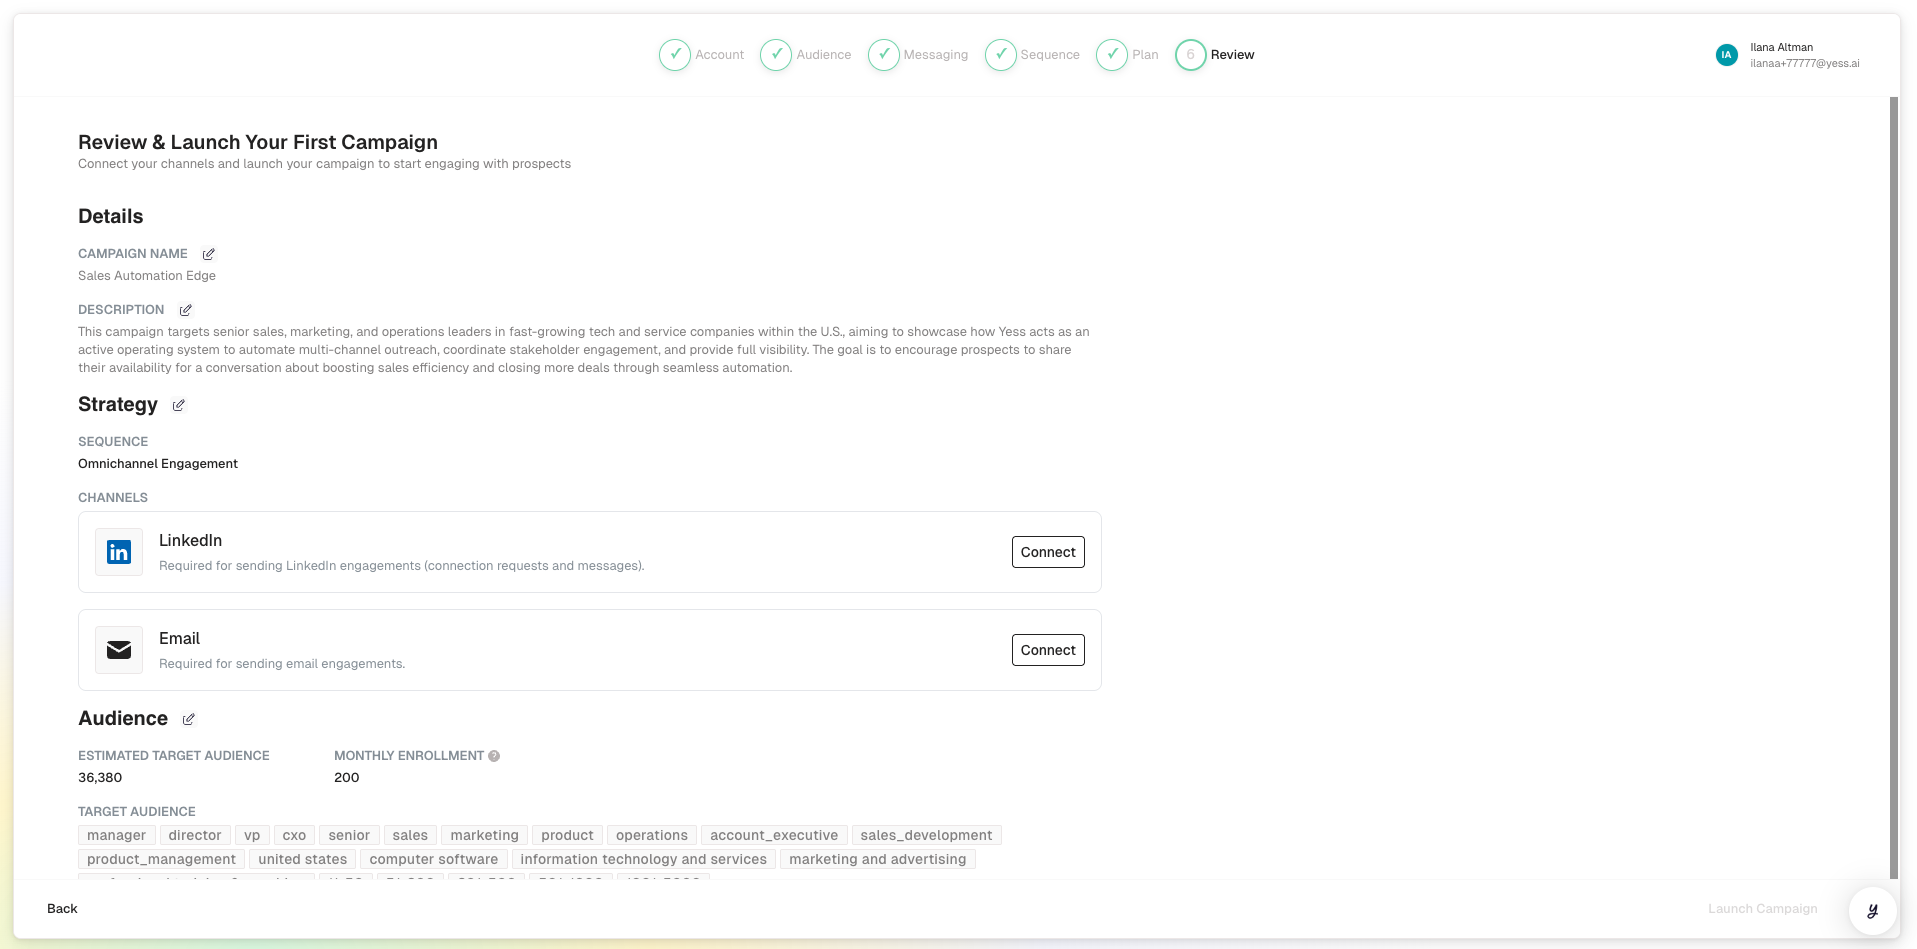
Ready to Launch?
- Click Save as Draft to continue editing later
- Click Launch Campaign to start outreach
Once launched, you cannot change the audience criteria or sequence strategy. Make sure everything looks correct before launching.
After Launching
Once your campaign is active:
- Monitor the Dashboard: Watch enrollment progress and early engagement
- Check Pending Approvals: If approval mode is on, review messages
- Respond to Replies: When leads respond, engage personally
- Track Performance: Review analytics after the first week
Campaign Settings Checklist
Before launching, verify:
| Setting | Status |
|---|---|
| AI-generated campaign name reviewed/edited | ☐ |
| Targeted ICP criteria (not too broad) | ☐ |
| Tone matches your brand | ☐ |
| Clear, compelling call-to-action | ☐ |
| Appropriate sequence for your audience | ☐ |
| All required channels connected | ☐ |
| Monthly quota is appropriate | ☐ |
Common Questions
Related Guides
- Customize Messaging — Advanced messaging guidance tips
- Track Performance — Monitoring your campaign
- Manage Leads — Working with enrolled leads